In this post
- At a Glance
- Why This Crochet Christmas Tree Ornament Pattern Works
- Materials and Tools
- Choosing the Right Yarn and Hook
- Gauge and Preparation
- Crochet Christmas Tree Ornament Pattern Instructions
- Variations and Customizing
- Troubleshooting Common Issues
- Care and Washing
- Frequently Asked Questions
- Completing Your Holiday Ornament
Creating handmade holiday decor adds a personal touch to your seasonal tree, and this crochet Christmas tree ornament pattern offers an engaging project you can finish in an afternoon. If you want a quick project that uses small yarn remnants from your stash, this small triangular tree fits the bill. Designed for a confident beginner, it uses basic single crochet rows paired with structured edge increases to build a classic evergreen profile topped with a crisp star and a ringing jingle bell.
Working up this crochet Christmas tree ornament pattern takes roughly 1-1.5 hours, making it suitable for making multiples as gift tags or garland accents. The dense cotton stitches hold their shape on the branch without folding or sagging. You will practice fundamental crochet skills, such as placing increases accurately at row ends, joining separate motifs, and securing metal findings to yarn edges.
At a Glance
Before you pick up your hook, review the key project specifications summarized below to prepare your workspace efficiently.
| Skill Level | Time to Complete | Finished Dimensions | Main Yarn | Key Technique |
|---|---|---|---|---|
| Confident beginner | 1-1.5 hours | width 3.8 in, length 3.8 in | DK weight 100% cotton yarn in Forest Green | Single crochet row increases |
Why This Crochet Christmas Tree Ornament Pattern Works
The strength of this design lies in its structural balance and compact size. Worked from the top apex downward in single crochet rows, the stitch counts expand predictably across 21 rows to form a neat, flat isosceles triangle. Because single crochet creates a dense, sturdy fabric, the finished piece holds its form naturally without internal wires or stiffening sprays.
Adding metallic gold accents provides an eye-catching contrast against the matte forest green yarn. The gold star motif works up in just two quick rounds, resting securely over the top point, while the 10 mm gold jingle bell balances the bottom edge with gentle movement and weight. Because the ornament uses only 25 yards of green yarn, it serves as an efficient stash-buster for quality cotton offcuts.
Materials and Tools
- DK weight 100% cotton yarn in Forest Green: 25 yds (23 m) / 10 g
- DK weight metallic yarn in Gold: 10 yds (9 m) / 4 g
- 1 gold metal jingle bell (10 mm / 0.4 in diameter) with attachment loop
- 3.5 mm (US E-4) crochet hook
- Yarn needle
- Scissors
- Measuring tape
- Pins or clips
Pro tip: Keep your metal jingle bell in a small dish on your work table so it does not roll away while you crochet the main body.
Choosing the Right Yarn and Hook
Selecting the correct yarn fiber directly affects the crispness of your tree’s triangular edges. A 100% cotton DK weight yarn provides the necessary stitch definition and structural rigidity that acrylic blends often lack. Stretchy synthetic fibers tend to curl along the edges when worked with edge increases, resulting in rounded, floppy corners rather than sharp points.
Pairing your DK cotton with a 3.5 mm (US E-4) hook creates dense, tightly packed single crochet stitches. For the star motif and hanging loop, a DK weight metallic yarn in gold introduces shine while maintaining a consistent yarn weight across the entire project. Avoid overly thin sewing metallics that might split under tension; choose a structured, plied metallic yarn that works smoothly with your 3.5 mm hook.
Gauge and Preparation
Checking your tension beforehand guarantees that your finished piece matches the intended size and proportions. The target gauge for this project is 20 sts x 22 rows = 4 in (10 cm) in single crochet using a 3.5 mm hook. Achieving this exact gauge ensures your tree reaches the exact finished dimensions width 3.8 in, length 3.8 in.
If your swatch produces fewer than 20 stitches across 4 inches, your tension is too loose; switch down to a 3.25 mm hook to tighten the stitches. If you count more than 20 stitches across 4 inches, switch up to a 3.75 mm hook. Keep your turning chain firm on every row so the side edges expand evenly from the top point down to the final 19-stitch bottom edge.
Crochet Christmas Tree Ornament Pattern Instructions
Follow the complete row-by-row instructions below to construct the tree body, star motif, hanging loop, and final assembly details.
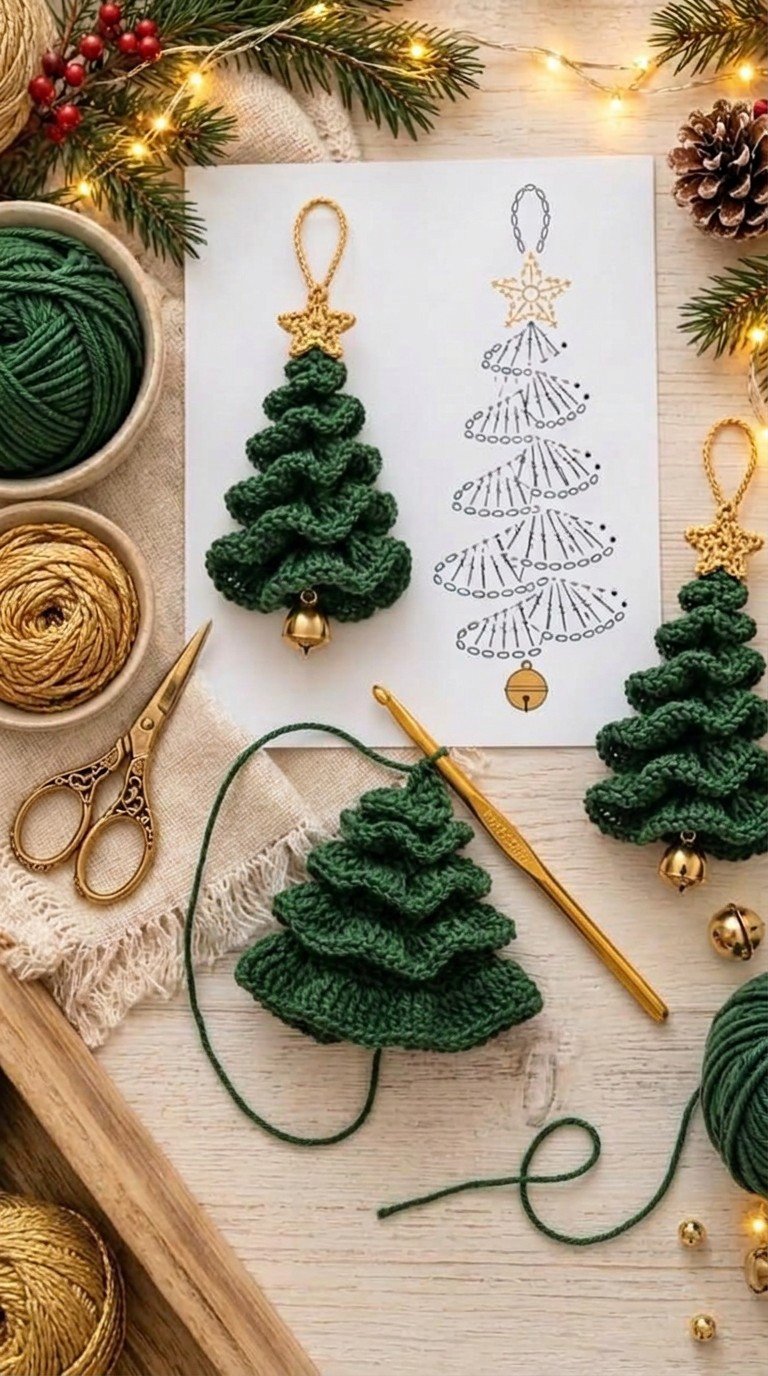
Finished size: 3.8 in (9.7 cm) wide x 3.8 in (9.7 cm) long (calculated from the gauge)
Gauge: 20 sts x 22 rows = 4 in (10 cm) in single crochet using 3.5 mm hook
Abbreviations (US terms)
| Abbreviation | Meaning |
|---|---|
| ch | chain |
| sc | single crochet |
| sl st | slip stitch |
| st | stitch |
| sts | stitches |
Pattern Notes
- The tree body is worked flat in rows from the top apex down to the base in single crochet.
- Turning chains do not count as a stitch.
- The star and hanging loop are crocheted separately in gold yarn and sewn to the tree.
- Finishing includes sewing the star and hanging loop to the top apex and attaching the jingle bell to the base.
Tree Body (Forest Green)
- Foundation Chain: ch 2 (2 chs)
- Row 1: sc in 2nd ch from hook, turn (1 st)
- Row 2: ch 1, 2 sc in st, turn (2 sts)
- Row 3: ch 1, 2 sc in first st, sc in next st, turn (3 sts)
- Row 4: ch 1, sc in each st across, turn (3 sts)
- Row 5: ch 1, 2 sc in first st, sc in next st, 2 sc in last st, turn (5 sts)
- Row 6: ch 1, sc in each st across, turn (5 sts)
- Row 7: ch 1, 2 sc in first st, sc in each of next 3 sts, 2 sc in last st, turn (7 sts)
- Row 8: ch 1, sc in each st across, turn (7 sts)
- Row 9: ch 1, 2 sc in first st, sc in each of next 5 sts, 2 sc in last st, turn (9 sts)
- Row 10: ch 1, sc in each st across, turn (9 sts)
- Row 11: ch 1, 2 sc in first st, sc in each of next 7 sts, 2 sc in last st, turn (11 sts)
- Row 12: ch 1, sc in each st across, turn (11 sts)
- Row 13: ch 1, 2 sc in first st, sc in each of next 9 sts, 2 sc in last st, turn (13 sts)
- Row 14: ch 1, sc in each st across, turn (13 sts)
- Row 15: ch 1, 2 sc in first st, sc in each of next 11 sts, 2 sc in last st, turn (15 sts)
- Row 16: ch 1, sc in each st across, turn (15 sts)
- Row 17: ch 1, 2 sc in first st, sc in each of next 13 sts, 2 sc in last st, turn (17 sts)
- Row 18: ch 1, sc in each st across, turn (17 sts)
- Row 19: ch 1, 2 sc in first st, sc in each of next 15 sts, 2 sc in last st, turn (19 sts)
- Row 20: ch 1, sc in each st across, turn (19 sts)
- Row 21: ch 1, sc in each st across, fasten off leaving an 8-inch tail (19 sts)
Gold Star Motif (Gold)
- Foundation Chain: ch 2 (2 chs)
- Row 1: work 5 sc in 2nd ch from hook, turn (5 sts)
- Row 2: *ch 2, sl st in 2nd ch from hook, sl st in next sc* 5 times, fasten off leaving an 8-inch tail (15 sts)
Hanging Loop (Gold)
- Foundation Chain: ch 36 (36 chs)
- Row 1: sl st in 2nd ch from hook and in each of next 34 ch, fasten off leaving an 8-inch tail (35 sts)
Finishing
- Weave in the starting green foundation tail securely on the back of the Tree Body.
- Place the Gold Star motif over Row 1 at the top apex of the tree. Using the 8-inch gold tail and a yarn needle, stitch through the center of the star to secure it to the tree.
- Fold the Hanging Loop into a loop. Using its 8-inch tail, sew both ends firmly to the back of Row 1 directly behind the star.
- Thread the 8-inch green tail from Row 21 through the attachment loop of the 10 mm gold jingle bell. Center the bell at stitch 10 of Row 21 on the bottom edge and stitch securely in place with 3 passes.
- Weave in all remaining yarn tails on the back and trim flush.
Variations and Customizing
You can adapt this foundational tree design using small design tweaks while keeping the core construction identical:
- Metallic Thread Edging: Work a round of surface slip stitches along the diagonal sides using the remaining metallic gold yarn for a highlighted edge.
- Dual-Tone Trees: Alternate rows of sage green and forest green yarn across the 21 rows to produce subtle horizontal striping.
- Silver Accent Swap: Replace the gold metallic yarn and gold bell with metallic silver yarn and a matching 10 mm silver jingle bell for a cool winter palette.
Note that this pattern is written for one size only; alternative sizing calculations are not included in this pattern.
Troubleshooting Common Issues
| Problem | Likely Cause | Correction |
|---|---|---|
| Tree sides look wavy or uneven | Inconsistent placement of edge increases | Ensure you place exactly 2 sc in the first stitch and 2 sc in the last stitch only on odd-numbered rows. |
| Bottom edge curls upward | Row 20 and 21 worked with overly tight tension | Maintain relaxed yarn flow on straight rows, and pin the bottom edge flat during light blocking. |
| Star motif sits lopsided | Stitching offset from the Row 1 apex | Align the center opening of the star directly over Row 1 before securing with the 8-inch gold tail. |
| Bell droops or twists | Insufficient securing passes through stitch 10 | Thread the green tail through the bell loop and anchor it firmly through stitch 10 using 3 secure passes. |
Care and Washing
Proper maintenance preserves the crisp cotton structure and metallic shine of your holiday decoration year after year. Spot clean with cold water and mild detergent; lay flat to air dry.
Do not submerge the ornament fully or run it through a machine cycle, as agitation can loosen the metallic fibers and compromise the bell attachment. Store flat between sheets of acid-free tissue paper during the off-season to avoid crushing the star points.
Frequently Asked Questions
What skill level is required for this crochet Christmas tree ornament pattern?
This project is tailored for a confident beginner who knows how to chain, single crochet, and slip stitch. The pattern uses straightforward edge increases on odd rows and basic hand-sewing techniques to join the star, loop, and bell.
Can I use worsted weight yarn instead of DK weight?
This pattern is designed specifically for DK weight yarn to achieve the finished dimensions width 3.8 in, length 3.8 in. Substituting worsted weight yarn will alter your gauge, creating a significantly larger and heavier ornament that may require a larger hook.
How do I keep my single crochet edges straight?
Count your stitches at the end of every row to verify you match the written stitch counts exactly. Be careful not to work an accidental extra stitch into the turning chain, which can cause the edges to bulge.
How is the jingle bell attached securely?
The bell is secured using the 8-inch green yarn tail left at the end of Row 21. Thread the tail through the metal attachment loop and sew it directly into stitch 10 on the bottom edge using 3 firm passes before weaving in the end.
Completing Your Holiday Ornament
Working through this crochet Christmas tree ornament pattern gives you a polished, handmade accent that brings texture to your seasonal decorating. By pairing structured DK cotton with metallic gold details, your finished piece will hang neatly on any branch. Make sure to weave your yarn tails thoroughly through dense single crochet stitches on the reverse side so your ornament stays secure for seasons to come. Note: this item contains a small metal bell and is not suitable for children under 3 (small parts).