In this post
- At a Glance
- Why This Braided Blanket Works So Well
- Materials and Tools Needed
- Choosing the Right Yarn and Maintaining Tension
- How to Crochet Braided Stitch Blanket Pattern
- Variations and Customizing Your Blanket
- Troubleshooting Cable Crochet Issues
- Frequently Asked Questions
- Completing Your Textured Braided Blanket
Learning how to crochet Braided Stitch Blanket projects gives you the power to transform simple bulky yarn into thick, tactile home decor. If you love deep ridges, rich texture, and cables that look like woven braids, this project brings those design elements together in a balanced structure. Designed for an intermediate crocheter, this pattern creates a substantial throw measuring width 50.4 in, length 60.0 in, making it suitable for living room armchairs or cool evening layering.
Working post stitches across wide panels requires attention to hand tension and stitch placement. By learning how to cross stitches correctly across a flat foundation row, you will create continuous vertical cable columns separated by dense half double crochet panels.
At a Glance
The essential specifications below give you a clear overview of the project scope, yarn weight, tool sizes, and expected time commitment before you begin.
| Project Feature | Specification |
|---|---|
| Craft | Crochet |
| Skill Level | Intermediate |
| Time Commitment | 15-20 hours |
| Finished Dimensions | width 50.4 in, length 60.0 in (128.0 cm x 152.4 cm) |
| Yarn | Bulky weight (category 5) 80% acrylic / 20% wool yarn |
| Hook Size | 9.0 mm (US M/N-13) |
| Key Techniques | Front post double crochet, back post double crochet, cable crossing |
Why This Braided Blanket Works So Well
The visual impact of this blanket comes from the contrast between flat background stitches and raised cable ridges. When you work front post double crochet (FPdc) stitches around the posts of previous rows, you bring the stitch forward into high relief. Crossing these post stitches to the left and right in alternating rows mimics a traditional three-strand braid without requiring complex, separate cable strips.
Bulky weight (category 5) yarn provides the structural body needed to keep these tall post stitches upright. Lighter yarns often collapse under cable tension, but a robust acrylic and wool blend creates firm, defined columns. The fabric remains thick and warm while maintaining a structured drape that rests flat on furniture without curling inward.
Materials and Tools Needed
Gathering the correct yarn weight and hook size ensures that your finished blanket matches the pattern gauge and required drape.
- Bulky weight (category 5) 80% acrylic / 20% wool yarn, approx. 400 yds (365 m) / 250 g per ball: Color A (Cream) – 400 yds (365 m) / 1 ball
- Bulky weight (category 5) 80% acrylic / 20% wool yarn: Color B (Light Brown / Camel) – 400 yds (365 m) / 1 ball
- Bulky weight (category 5) 80% acrylic / 20% wool yarn: Color C (Dark Brown) – 400 yds (365 m) / 1 ball
- Bulky weight (category 5) 80% acrylic / 20% wool yarn: Color D (Burnt Orange / Rust) – 400 yds (365 m) / 1 ball
- Bulky weight (category 5) 80% acrylic / 20% wool yarn: Color E (Deep Red / Burgundy) – 400 yds (365 m) / 1 ball
- Size 9.0 mm (US M/N-13) crochet hook (or size needed to obtain gauge)
- Tapestry needle
- Locking stitch markers
- Scissors
- Pins or clips
Choosing the Right Yarn and Maintaining Tension
Selecting an 80% acrylic and 20% wool blend in bulky weight (category 5) gives you both softness and structural resilience. The wool content adds elasticity, which helps post stitches spring back into shape after crossing. The acrylic fibers maintain yarn integrity and resist excessive fuzzing.
Consistent tension is critical when working cable crosses. Because post stitches are worked around the vertical stem of a stitch rather than into the top loops, they draw yarn across a greater distance. Pull your working loops up to the full height of the current row before completing the stitch to prevent the fabric from puckering or pulling the edges inward.
Pro tip: When working crossed front post stitches, do not pull your working yarn tight as you reach across skipped stitches. Keep your loop height loose and even so the fabric stays flat and supple.
How to Crochet Braided Stitch Blanket Pattern
The full step-by-step instructions below detail how to establish the setup row, execute cable crosses across each gradient block, and finish your edges cleanly.
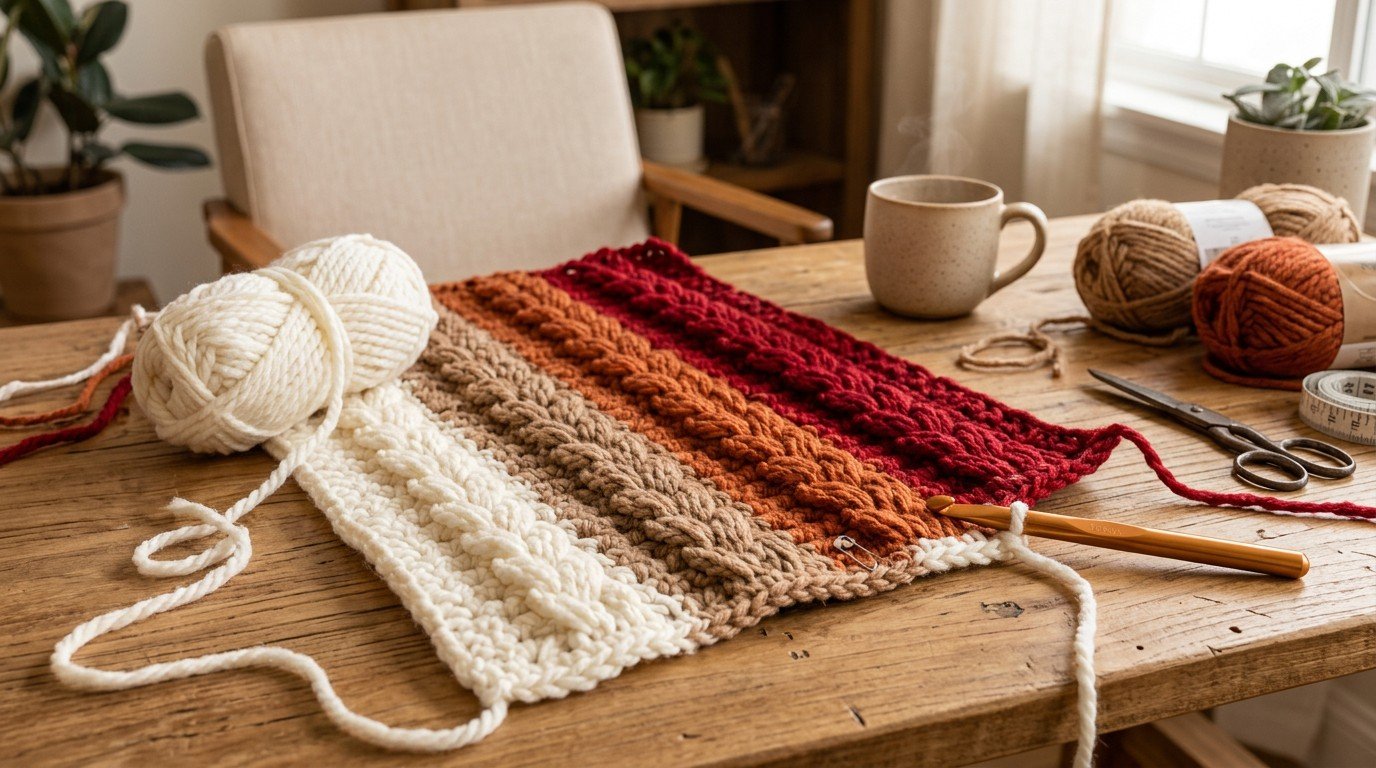
Finished size: 50.4 in (128.0 cm) wide x 60 in (152.4 cm) long (calculated from the gauge)
Gauge: 10 sts and 8 rows = 4 in (10 cm) in cable pattern stitch using 9.0 mm hook
Abbreviations (US terms)
| Abbreviation | Meaning |
|---|---|
| ch | chain |
| st | stitch |
| sts | stitches |
| hdc | half double crochet |
| FPdc | front post double crochet: yarn over, insert hook from front to back to front around post of indicated stitch, yarn over and pull up loop, [yarn over, pull through 2 loops] twice |
| BPdc | back post double crochet: yarn over, insert hook from back to front to back around post of indicated stitch, yarn over and pull up loop, [yarn over, pull through 2 loops] twice |
| yo | yarn over |
| RS | right side |
| WS | wrong side |
| rep | repeat |
Pattern Notes
- The blanket is worked flat in back-and-forth rows from bottom to top.
- Pattern stitch multiple: 10 sts + 6 (foundation chain is a multiple of 10 + 7).
- Turning chain-2 counts as the first hdc of the row throughout. The first worked stitch of each row is placed in the 2nd stitch of the previous row, and the final stitch of each row is placed into the top of the turning chain-2.
- Cable crosses are worked on RS rows using front post stitches. On WS rows, back post stitches maintain the raised appearance on the right side.
- Color changes are made in the final yarn over of the last hdc of Rows 24, 48, 72, and 96. Fasten off the old color leaving a 6-inch tail for weaving.
- Maintaining even tension when crossing post stitches is critical to avoid pulling the fabric inward.
Blanket Body
- With Color A and 9.0 mm hook, ch 127 loosely (127 ch)
- Row 1: (RS – Setup): Hdc in 3rd ch from hook (skipped 2 ch counts as first hdc), hdc in each ch across to end, turn (126 sts)
- Row 2: (WS): Ch 2 (counts as first hdc), hdc in next 4 sts, *BPdc around next 6 sts, hdc in next 4 sts; rep from * 10 more times, BPdc around next 6 sts, hdc in next 4 sts, hdc in top of turning ch-2, turn (126 sts)
- Row 3: (RS – Cable Cross 1): Ch 2 (counts as first hdc), hdc in next 4 sts, *skip next 2 sts, FPdc around next 2 sts, working behind sts just made FPdc around 2 skipped sts, FPdc around next 2 sts, hdc in next 4 sts; rep from * 10 more times, skip next 2 sts, FPdc around next 2 sts, working behind sts just made FPdc around 2 skipped sts, FPdc around next 2 sts, hdc in next 4 sts, hdc in top of turning ch-2, turn (126 sts)
- Row 4: (WS): Ch 2 (counts as first hdc), hdc in next 4 sts, *BPdc around next 6 sts, hdc in next 4 sts; rep from * 10 more times, BPdc around next 6 sts, hdc in next 4 sts, hdc in top of turning ch-2, turn (126 sts)
- Row 5: (RS – Cable Cross 2): Ch 2 (counts as first hdc), hdc in next 4 sts, *FPdc around next 2 sts, skip next 2 sts, FPdc around next 2 sts, working in front of sts just made FPdc around 2 skipped sts, hdc in next 4 sts; rep from * 10 more times, FPdc around next 2 sts, skip next 2 sts, FPdc around next 2 sts, working in front of sts just made FPdc around 2 skipped sts, hdc in next 4 sts, hdc in top of turning ch-2, turn (126 sts)
- Row 6: (WS): Ch 2 (counts as first hdc), hdc in next 4 sts, *BPdc around next 6 sts, hdc in next 4 sts; rep from * 10 more times, BPdc around next 6 sts, hdc in next 4 sts, hdc in top of turning ch-2, turn (126 sts)
- Rows 7-24: Rep Rows 3-6 four more times, plus Row 3 and Row 4 once more; on Row 24 change to Color B in last yo of final hdc, cut Color A leaving a 6-inch tail, turn (126 sts)
- Rows 25-48: With Color B, rep Rows 5-6 once, then rep Rows 3-6 five times, then rep Row 3 and Row 4 once; on Row 48 change to Color C in last yo of final hdc, cut Color B leaving a 6-inch tail, turn (126 sts)
- Rows 49-72: With Color C, rep Rows 5-6 once, then rep Rows 3-6 five times, then rep Row 3 and Row 4 once; on Row 72 change to Color D in last yo of final hdc, cut Color C leaving a 6-inch tail, turn (126 sts)
- Rows 73-96: With Color D, rep Rows 5-6 once, then rep Rows 3-6 five times, then rep Row 3 and Row 4 once; on Row 96 change to Color E in last yo of final hdc, cut Color D leaving a 6-inch tail, turn (126 sts)
- Rows 97-119: With Color E, rep Rows 5-6 once, then rep Rows 3-6 five times, then rep Row 5 once, turn (126 sts)
- Row 120: (WS – Top Border Edge): Ch 2 (counts as first hdc), hdc in each st across to end, working final hdc in top of turning ch-2, fasten off leaving an 8-inch tail (126 sts)
Finishing
- Thread each yarn tail onto a tapestry needle.
- Weave all ends securely into the wrong side of matching color blocks, running tails through the dense background hdc stitches and behind cable ridges for at least 2 inches in alternating directions.
- Trim remaining yarn ends close to the fabric.
- Wet block or steam block gently: lay the blanket flat on blocking mats, pin outer edges straight to 50.4 in x 60 in (128 cm x 152 cm), and allow to dry completely.
Variations and Customizing Your Blanket
While the gradient transition from Color A through Color E creates a rich colorway, you can customize the appearance to suit different interiors:
- Monochrome Solid: Work the entire piece using 5 balls of a single solid color to highlight the texture of the braided cables without visual breaks.
- Two-Tone Alternating Stripes: Alternate between two contrasting shades every 24 rows for bold, graphic horizontal bands across the vertical braids.
- Three-Color Ombre: Use three complementary shades, extending the center color block for a wider middle panel.
Troubleshooting Cable Crochet Issues
Working multi-stitch cables with heavy yarn can present occasional tension and alignment challenges. Use this quick reference table to diagnose and correct common issues.
| Problem | Probable Cause | Correction |
|---|---|---|
| Blanket edges taper inward | Cable crossing stitches worked too tightly, pulling the fabric narrow | Lift your hook higher when pulling up loops for FPdc stitches to match row height. |
| Cable ribs lean diagonally instead of braiding | Working crosses in the same direction on both Row 3 and Row 5 | Ensure Row 3 crosses behind skipped stitches and Row 5 crosses in front of skipped stitches. |
| Stitch count does not match 126 sts at row end | Accidentally working into the tops of stitches behind post stitches | Skip the top loops of stitches where post stitches have already been worked around the stem. |
| Wrong side post stitches appear on the front | Working FPdc instead of BPdc on even-numbered rows | Work BPdc from the back of the work on all even-numbered wrong-side rows. |
Frequently Asked Questions
How many yards of yarn do I need to crochet a braided stitch blanket?
You need approximately 2,000 yards (1,825 m) of bulky weight (category 5) yarn divided evenly across five balls. This provides enough yardage for the 120-row body, color transitions, and edge borders.
Can I use a different yarn weight for this blanket pattern?
This specific pattern is calibrated for bulky weight (category 5) yarn worked with a 9.0 mm hook. Other yarn weights are not covered by this pattern, as they will alter the finished dimensions and cable density.
How do I prevent my front post cables from pulling the fabric too tight?
Pull each yarn-over loop up to the level of your current row before finishing the double crochet. Extending the stitch height prevents the crossed posts from cinching the background fabric.
How do I block an acrylic and wool-blend crochet blanket?
Lay the blanket flat on blocking mats, pin the edges straight to 50.4 in x 60.0 in, and wet block or steam block gently. Allow the piece to dry completely before unpinning to set the straight edges.
Completing Your Textured Braided Blanket
Learning how to crochet Braided Stitch Blanket designs provides a reliable method for creating thick, structured home textiles. The combination of crossed front post stitches and a stable foundation row creates a finished blanket with warmth. Keep your post stitch tension relaxed as you work through each color block, and you will have a thick, tactile throw ready to enjoy on any chair or sofa.