

In this post
- At a Glance
- Why This Crochet Fingerless Gloves Pattern Works
- Materials and Tools Needed
- Choosing the Right Yarn and Hook
- Gauge and Sizing
- Step-by-Step Crochet Fingerless Gloves Pattern
- Variations and Customization Ideas
- Troubleshooting Common Issues
- Care and Washing
- Frequently Asked Questions
- Enjoy Your Handmade Fingerless Gloves
Learning how to make a cozy accessory is one of the most practical projects you can tackle with your hook. This beginner-friendly Crochet Fingerless Gloves Pattern teaches you how to create a pair of textured, comfortable mitts that keep your hands warm while leaving your fingers free for typing, crafting, or texting. Worked entirely flat as simple rectangles and seamed up the sides, this project removes the stress of working in tight rounds or shaping complicated thumb gussets.
You will work simple half double crochet stitches into the back loops only, creating a stretchy, vertical ribbed fabric that hugs the wrist and hand comfortably. Whether you are building your core stitch skills or need a quick handmade gift that comes together in an afternoon, this step-by-step tutorial guides you through the entire process with clear instructions and dependable finishing techniques.
At a Glance
Before pulling your yarn from the skein, review the essential project details in the summary below to plan your crafting session.
| Skill Level | Time to Complete | Finished Dimensions | Main Material | Primary Technique |
|---|---|---|---|---|
| Beginner | 2-3 hours | width 7.1 in, length 6.9 in, circumference 6.9 in | 175 yds (160 m) DK weight acrylic yarn | Half double crochet in the back loop only (hdc blo) |
Why This Crochet Fingerless Gloves Pattern Works
Traditional gloves often intimidate beginners because they require shaping fingers, working small circumferences in the round, and managing continuous increases. This design avoids those hurdles by treating each glove as a flat rectangle worked side-to-side in rows. The vertical orientation means your starting chain establishes the total length from forearm to knuckles, while the total number of rows creates the circumference around your palm.
Working half double crochet stitches into the back loop only creates deep, flexible ridges. This specific stitch structure behaves much like knit ribbing, offering excellent horizontal elasticity. The fabric expands easily over the knuckles and springs back to fit the wrist snugly without requiring complex stitch increases or decreases.
Pro tip: Always count your stitches at the end of every second row. Because half double crochet ribbing can pull slightly at the ends, it is easy to accidentally skip the final stitch of the row or add an extra turning chain stitch.
Materials and Tools Needed
Having the correct notions prepared ensures smooth assembly from your initial chain to the final seam.
- 175 yds (160 m) DK weight yarn (100% acrylic, 3.5 oz / 100 g per 262 yds / 240 m) in Pastel Lilac
- 4.5 mm (US 7) crochet hook
- Yarn needle
- Stitch markers (2)
- Tape measure
- Scissors
Choosing the Right Yarn and Hook
A DK weight (category 3) yarn offers the ideal balance of warmth, drape, and stitch definition for hand accessories. A 100% acrylic or wool blend yarn provides the structural memory needed for ribbing to maintain its stretch over repeated wear. Yarns with too much weight, like bulky wools, create stiff seams around the palm, while delicate lace yarns lack the warmth and density required for cold weather.
Pairing your DK yarn with a 4.5 mm (US 7) crochet hook produces a balanced fabric that is neither too loose nor too dense. A hook that is too small creates a rigid fabric that will not stretch around the hand, while an oversized hook produces loose stitches that let chilly drafts pass through.
Gauge and Sizing
Achieving the correct gauge ensures your gloves match the planned hand circumference and do not slide off your wrists. To verify your tension, work a small swatch in half double crochet through the back loop only before starting your gloves.
Your gauge should measure exactly 18 sts x 14 rows = 4 x 4 in (10 x 10 cm) in hdc blo ribbing. The pattern is designed in one size to fit an Adult Small/Medium with a 7-8 in (18-20 cm) hand circumference. The finished rectangle creates finished dimensions of width 7.1 in, length 6.9 in, circumference 6.9 in when laid flat.
Step-by-Step Crochet Fingerless Gloves Pattern
Follow the complete instructions below to crochet your flat ribbed panels and seam them into comfortable, wearable gloves.
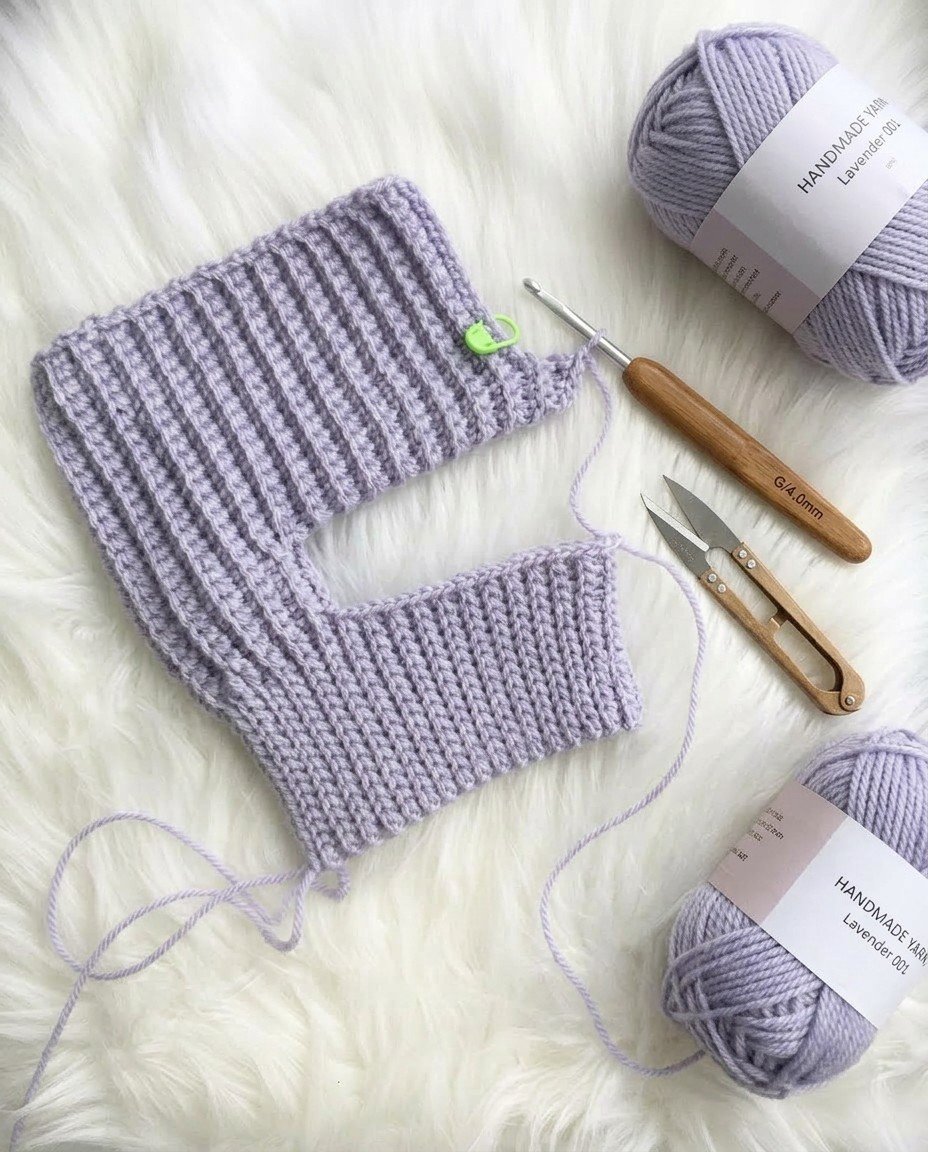
Finished size: 7.1 in (18.0 cm) wide x 6.9 in (17.5 cm) long (calculated from the gauge)
Gauge: 18 sts x 14 rows = 4 x 4 in (10 x 10 cm) in hdc blo ribbing
Abbreviations (US terms)
| Abbreviation | Meaning |
|---|---|
| ch | chain |
| hdc | half double crochet |
| blo | back loop only |
| RS | right side |
| WS | wrong side |
| st | stitch |
| sts | stitches |
Pattern Notes
- Turning chain-1 does NOT count as a stitch throughout.
- Gloves are worked flat as identical ribbed rectangles in back-and-forth rows, then folded and seamed along the side with a gap left open for the thumb.
- To work in the back loop only (blo), insert hook under only the back strand (farthest from you) of the top ‘V’ of the stitch.
- Foundation chain multiple: any number of chains. Row count multiple: any even number of rows.
- Both left and right gloves are made identically from the same instructions.
First Glove (Pastel Lilac)
- Ch 33.
- Row 1: (RS): Hdc in 2nd ch from hook and in each ch across, turn (32 hdc).
- Row 2: (WS): Ch 1, hdc in blo of each st across, turn (32 hdc).
- Rows 3-24: Ch 1, hdc in blo of each st across, turn (32 hdc).
Second Glove (Pastel Lilac)
- Ch 33.
- Row 1: (RS): Hdc in 2nd ch from hook and in each ch across, turn (32 hdc).
- Row 2: (WS): Ch 1, hdc in blo of each st across, turn (32 hdc).
- Rows 3-24: Ch 1, hdc in blo of each st across, turn (32 hdc).
Finishing
- Fasten off both gloves using scissors, leaving a 40 in (102 cm) tail on each for seaming.
- Fold one glove rectangle in half lengthwise with right sides facing together, aligning the 32 stitches of Row 1 with the 32 stitches of Row 24.
- Place stitch markers at stitch 25 and stitch 18 through both layers to mark the 8-stitch thumb opening, measuring with the tape measure to confirm placement.
- Thread the yarn needle with the 40 in (102 cm) tail at the top finger edge.
- Whipstitch through both layers across the first 7 stitches (sts 32 down to 26) to create the upper seam (1.56 in / 4.0 cm). Secure with a knot on the wrong side.
- Pass the needle through the inner edge of one layer only across the next 8 stitches (sts 25 down to 18, between the stitch markers) to leave a 1.78 in (4.5 cm) opening for the thumb. Remove stitch markers.
- Whipstitch through both layers across the remaining 17 stitches (sts 17 down to 1) down to the wrist edge (3.78 in / 9.6 cm). Secure yarn with a knot.
- Repeat seaming steps for the second glove.
- Turn both gloves right side out and weave in all yarn tails on the inside with the yarn needle.
Variations and Customization Ideas
While the standard design produces a classic accessory, you can adapt your approach to suit your aesthetic preferences within the established pattern structure.
- Color Blocking: Change yarn colors every two rows to create distinct vertical stripes along the length of your gloves, always fastening off cleanly at the outer edges.
- Tonal Contrast Seaming: Use a complementary shade of DK yarn for your 40 in (102 cm) seaming tail to create a deliberate decorative whipstitch along the outer hand edge.
- Yarn Fiber Tweaks: Substitute the acrylic yarn for a washable merino wool blend of the exact same DK weight to add natural water resistance and extra warmth.
Pro tip: When working your first row into the foundation chain, insert your hook into the bottom back bump of each chain. This leaves a clean, braided edge along the top finger opening that perfectly matches the opposite edge.
Troubleshooting Common Issues
If your glove panel looks uneven or feels tight during assembly, use this reference table to correct your technique.
| Problem | Underlying Cause | Solution |
|---|---|---|
| Gloves are too narrow or tight | Tension is tighter than the specified 18 sts per 4 in gauge | Switch to a larger hook or check your gauge swatch to ensure 18 sts x 14 rows equals 4 x 4 in (10 x 10 cm). |
| Edges of rectangle slant diagonally | Missing the final stitch or working into the turning chain | Count your row after turning to confirm an exact count of 32 hdc on every single row. |
| Thumb opening feels misaligned | Stitch markers placed at incorrect stitch intervals | Ensure markers are placed precisely at stitch 25 and stitch 18 through both layers before seaming. |
| Seam puckers along the side edge | Whipstitch tension pulled too tightly during finishing | Maintain gentle, even tension when seaming with your yarn needle so the ribbing can stretch naturally. |
Care and Washing
Taking proper care of your handmade items preserves their elasticity and fabric softness season after season. Hand wash cold with mild detergent, reshape and lay flat to dry.
Frequently Asked Questions
Can I use worsted weight yarn instead of DK weight for this crochet fingerless gloves pattern?
Worsted weight yarn is heavier than DK weight and will alter your stitch tension, producing a glove that is noticeably larger and stiffer. If you must use worsted yarn, you must make a gauge swatch to verify if your stitch dimensions match the required 18 sts x 14 rows per 4 x 4 in (10 x 10 cm).
How do I adjust the size for a larger or smaller hand circumference?
This specific pattern is written for one standard Adult Small/Medium size with fixed stitch counts. Other sizes are not covered by this pattern, as changing the row count or starting chain alters the exact placement of the 8-stitch thumb opening.
What does hdc blo mean in crochet terms?
The abbreviation hdc blo stands for half double crochet worked in the back loop only. Instead of inserting your hook under both top loops of the stitch below, you insert it solely under the rear loop, which creates the raised horizontal ridge on the opposite side.
Why do I need to leave a 40-inch tail for seaming?
A long 40 in (102 cm) yarn tail allows you to complete the upper 7-stitch seam, bridge across the 8-stitch thumb opening, and seam the remaining 17 stitches down to the wrist continuously. Using one unbroken tail avoids extra knots and loose yarn ends inside your glove.
Enjoy Your Handmade Fingerless Gloves
Completing this Crochet Fingerless Gloves Pattern gives you a versatile, comfortable pair of mitts that showcase the beauty of simple vertical ribbing. By practicing basic flat construction, stitch control, and precise seaming, you have built foundational crochet skills that apply to many future garment projects. Slip your new gloves on to keep your hands warm during chilly mornings, and keep your yarn needle handy for your next rewarding project.


