In this post
- At a Glance: Crochet Christmas House Ornament Pattern
- Why You Will Love Making This Festive Ornament
- Materials and Tools Needed
- Choosing and Preparing Your Yarn
- Understanding Gauge and Sizing
- Crochet Christmas House Ornament Pattern Instructions
- Variations and Customizing Ideas
- Troubleshooting Common Issues
- Care and Washing
- Frequently Asked Questions
- Bring Handmade Warmth to Your Holiday Tree
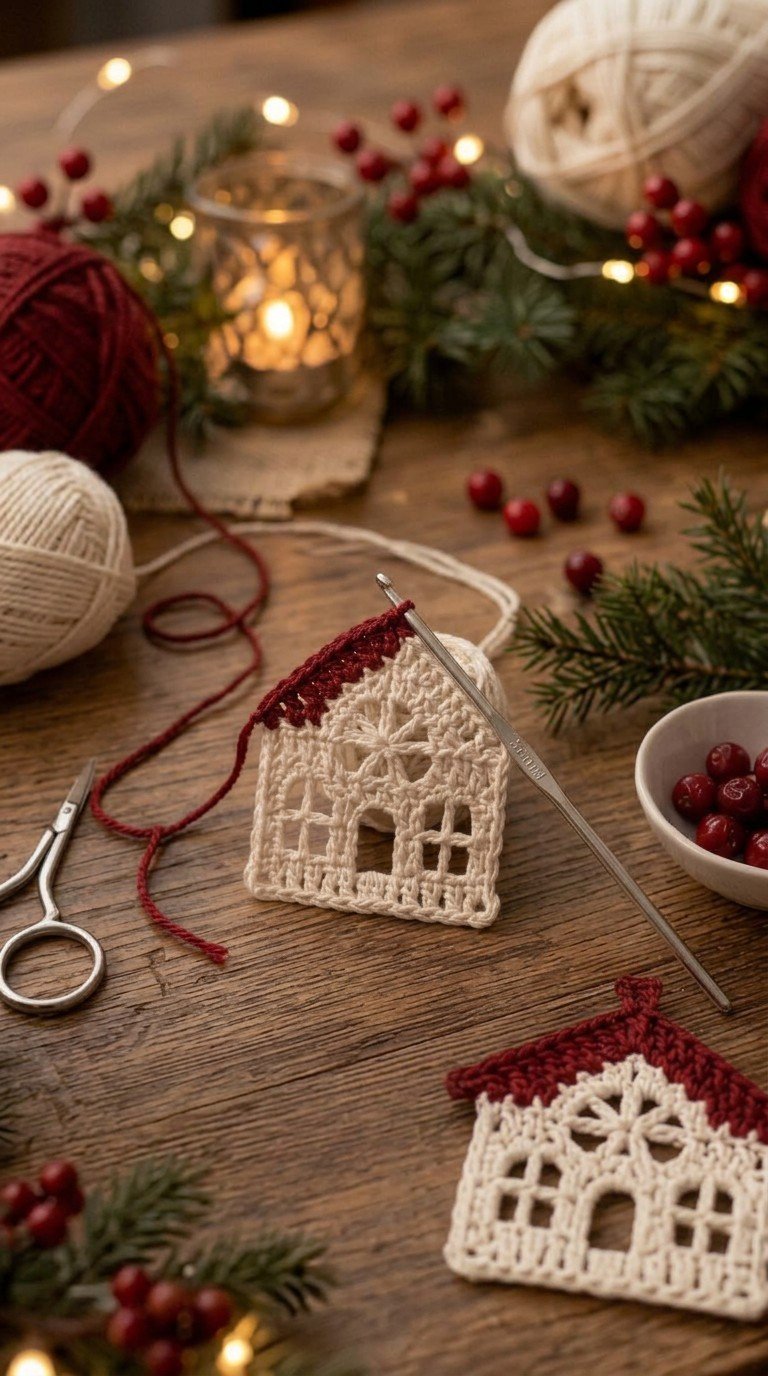
Creating handmade holiday decorations adds warmth and character to your tree, and this Crochet Christmas House Ornament Pattern provides the exact steps needed to craft a flat cottage motif. Designed for intermediate crocheters, this project combines traditional rows with openwork grid techniques to create distinct windows and a peaked roofline. Working with fine cotton yarn ensures every architectural detail remains crisp and visible when hung. In this comprehensive tutorial, you will master foundation shaping, symmetrical roof decreases, an integrated chimney, and a clean single crochet border with a built-in hanging loop.
At a Glance: Crochet Christmas House Ornament Pattern
Before picking up your hook, reviewing the project specifications ensures you have the right materials and time set aside for your crafting session.
| Skill Level | Time Investment | Finished Dimensions | Primary Materials | Key Techniques |
|---|---|---|---|---|
| Intermediate | 1-1.5 hours per ornament | width 3.8 in, length 3.7 in | Sport weight (2) cotton in Cream and Red, 3.25 mm hook | Openwork mesh windows, color changes, single crochet edging |
Why You Will Love Making This Festive Ornament
Working flat motifs offers a structured, manageable pace that fits neatly into a busy holiday schedule. Unlike three-dimensional items that require complex assembly or internal shaping, flat houses hold their silhouette through calculated decreases and neat edge stitches. You can easily complete one house in a single evening session.
The geometric openwork windows create negative space that catches the warm glow of Christmas tree lights. By changing colors from a neutral cream body to a vibrant red roof, the architectural lines pop without requiring complex embroidery or post-construction sewing.
Pro tip: Maintain firm, consistent tension on your turning chains. A tight edge prevents the sides of the house from bowing outward before you add the stabilizing border.
Materials and Tools Needed
Gather the specific supplies required to achieve the correct stitch density and structural stability for this ornament.
- Sport weight (category 2) 100% cotton yarn in Cream: 1 ball / 50 g (approx. 35 yds / 32 m used)
- Sport weight (category 2) 100% cotton yarn in Red: 1 ball / 50 g (approx. 25 yds / 23 m used)
- Size US D-3 (3.25 mm) crochet hook
- Yarn needle
- Scissors
- Measuring tape
- Pins or clips
Choosing and Preparing Your Yarn
The structure of this ornament relies heavily on the fiber characteristics of sport weight 100% cotton yarn. Cotton provides rigid stitch memory and zero halo, allowing the chain-space windows and treble crochet attic motif to stay sharply defined. Softer, stretchy fibers like acrylic tend to round out the corners and collapse the open mesh spaces when hung.
Select a sport weight (category 2) cotton with a smooth, tight twist. When working the color transition from the cream body to the red roof, ensure your yarn tails are firmly anchored on the wrong side to prevent the red stitches from bleeding into the lighter cream foundation.
Understanding Gauge and Sizing
Matching the design gauge guarantees your finished ornament achieves the intended proportions without distortion. The pattern is calculated for a gauge of 22 sts and 12 rows = 4 in (10 cm) in double crochet using a 3.25 mm (US D-3) hook. Working at this exact tension produces finished dimensions of width 3.8 in, length 3.7 in before adding the outer single crochet edging.
If your swatch yields fewer stitches across four inches, your hook is too large, which will cause the window grid to look loose and floppy. Conversely, working too tightly can compress the height, turning the square house body into a short rectangle. Adjust your hook size until your stitch counts match the gauge target precisely.
Crochet Christmas House Ornament Pattern Instructions
Follow the complete written instructions below to work the cream house body, the tapered red roof and chimney, and the continuous outer border.
Finished size: 3.8 x 3.7 in (9.7 x 9.4 cm) before the border; about 4.2 x 4.1 in (10.7 x 10.4 cm) finished with the border (calculated from the gauge)
Gauge: 22 sts and 12 rows = 4 in (10 cm) in double crochet using 3.25 mm hook
Abbreviations (US terms)
| Abbreviation | Meaning |
|---|---|
| ch | chain |
| dc | double crochet |
| dc2tog | double crochet 2 stitches together |
| dc3tog | double crochet 3 stitches together |
| dc6tog | double crochet 6 stitches together |
| RS | right side |
| sc | single crochet |
| sk | skip |
| sl st | slip stitch |
| tr | treble crochet |
| WS | wrong side |
| sp | space |
| sps | spaces |
| st | stitch |
| sts | stitches |
| tog | together |
Pattern Notes
- The house ornament is worked flat in turned rows from the bottom up.
- The body is worked in Cream yarn featuring openwork mesh windows and an attic motif.
- The roof and chimney are worked directly onto the top edge of the body in Red yarn.
- A clean single crochet border is worked around the entire outer perimeter in Cream yarn.
- Turning ch-3 counts as 1 double crochet throughout unless otherwise stated.
- Turning ch-1 does not count as a stitch.
- Fasten off each color at color changes; weave in ends before working the final border or enclose them within the border stitches.
House Body (Cream)
- With Cream yarn, ch 23.
- Row 1: (RS): dc in 4th ch from hook (skipped 3 ch count as first dc), dc in each of next 19 ch, turn (21 dc).
- Row 2: (WS – Lower Windows): ch 3 (counts as dc), dc in each of next 3 dc, [ch 1, sk next dc, dc in next dc] 2 times, dc in each of next 5 dc, [ch 1, sk next dc, dc in next dc] 2 times, dc in each of next 3 dc, dc in top of turning ch-3, turn (17 dc, 4 ch-1 sps) (21 sts).
- Row 3: (RS – Upper Windows): ch 3 (counts as dc), dc in each of next 3 dc, [ch 1, sk next ch-1 sp, dc in next dc] 2 times, dc in each of next 5 dc, [ch 1, sk next ch-1 sp, dc in next dc] 2 times, dc in each of next 3 dc, dc in top of turning ch-3, turn (17 dc, 4 ch-1 sps) (21 sts).
- Row 4: (WS – Solid Divider): ch 3 (counts as dc), dc in each of next 3 dc, [dc in next ch-1 sp, dc in next dc] 2 times, dc in each of next 5 dc, [dc in next ch-1 sp, dc in next dc] 2 times, dc in each of next 3 dc, dc in top of turning ch-3, turn (21 dc).
- Row 5: (RS – Attic Window Motif): ch 3 (counts as dc), dc in each of next 6 dc, ch 2, sk next 2 dc, tr in each of next 3 dc, ch 2, sk next 2 dc, dc in each of next 7 dc (last dc in top of turning ch-3), turn (14 dc, 3 tr, 2 ch-2 sps) (21 sts).
- Row 6: (WS – Top Body Row): ch 3 (counts as dc), dc in each of next 6 dc, 2 dc in next ch-2 sp, dc in each of next 3 tr, 2 dc in next ch-2 sp, dc in each of next 7 dc (last dc in top of turning ch-3) (21 dc). Fasten off Cream.
Roof and Chimney (Red)
- Row 1: (RS): With RS facing, join Red yarn with sl st in first dc of Row 6 of House Body; ch 3 (counts as dc), dc2tog over next 2 dc, dc in each of next 15 dc, dc2tog over next 2 dc, dc in top of turning ch-3, turn (19 sts).
- Row 2: (WS): ch 3 (counts as dc), dc3tog over next 3 sts, dc in each of next 11 sts, dc3tog over next 3 sts, dc in top of turning ch-3, turn (15 sts).
- Row 3: (RS): ch 3 (counts as dc), dc3tog over next 3 sts, dc in each of next 7 sts, dc3tog over next 3 sts, dc in top of turning ch-3, turn (11 sts).
- Row 4: (WS): ch 3 (counts as dc), dc3tog over next 3 sts, dc in each of next 3 sts, dc3tog over next 3 sts, dc in top of turning ch-3, turn (7 sts).
- Row 5: (RS – Peak): ch 2, dc6tog over remaining 6 sts (counts together with ch-2 as 1 peak st). Fasten off Red (1 st).
- Chimney Row 1: With RS facing, join Red yarn with sl st in the side edge of Roof Row 3 on the right roof slope; ch 1 (does not count as st), work 3 sc evenly along the side edge of Roof Rows 3 and 4, turn (3 sc).
- Chimney Row 2: ch 1, sc in each of the 3 sc across, turn (3 sc).
- Chimney Row 3: ch 1, sc in each of the 3 sc across (3 sc). Fasten off Red.
Border and Hanging Loop (Cream)
- Round 1: (RS): With RS facing, join Cream yarn with sl st in the bottom-left corner of the House Body (rem loop of foundation ch); ch 1 (does not count as st), 21 sc across foundation chain edge to bottom-right corner, (sc, ch 1, sc) in corner, 12 sc evenly up the right body edge (2 sc per dc row end), 10 sc evenly up right roof edge and around chimney, (sc, ch 25, sc) in roof peak to form hanging loop, 10 sc evenly down left roof edge, 12 sc evenly down left body edge (2 sc per dc row end), (sc, ch 1) in same corner st as first sc, sl st in first sc to join (70 sc, 2 ch-1 sps, 1 ch-25 hanging loop). Fasten off Cream (70 sts).
Finishing
- Weave in all remaining yarn ends on the wrong side using a yarn needle.
- Gently steam block or wet block the ornament flat to open up the mesh windows and square the house corners, pinning along outer edges at 4 in (10 cm) wide by 4 in (10 cm) tall until completely dry.
Variations and Customizing Ideas
Once you are comfortable with the base pattern, subtle color and arrangement adjustments allow you to build an entire holiday display.
- Monochrome Scandinavian Palette: Work the body in raw ecru and the roof in slate grey or muted forest green for a minimalist, Nordic-inspired theme.
- Holiday Bunting Garland: Instead of fastening off after the top hanging loop, crochet a long continuous foundation chain between multiple finished house motifs to create a mantel garland.
- Contrasting Chimney Accent: Fasten off the red roof before the chimney rows and join a deep charcoal yarn to give your house a realistic brick or stone chimney stack.
Troubleshooting Common Issues
If your ornament is not laying flat or your edges appear uneven, reference the common issues and targeted corrections below.
| Problem | Root Cause | Correction |
|---|---|---|
| Curling side edges | Single crochet border worked too tightly along the row ends | Maintain a loose tension and ensure you place exactly 2 sc per dc row end along the body. |
| Distorted window spaces | Crocheting into the chain space instead of working over it on solid rows | Work directly into the ch-1 spaces on Row 4 as written to encase the chain neatly. |
| Asymmetrical roof slope | Missed decrease stitches at the beginning or end of red rows | Count your total stitches at the end of every roof row to verify the 4-stitch reduction per row. |
| Slanted house walls | Skipping the final double crochet in the top of the turning chain | Always work your last stitch into the third chain of the beginning ch-3 on every body row. |
Care and Washing
To preserve the shape and crisp stitch definition of your handmade ornament across multiple holiday seasons, proper maintenance is essential. Hand wash cold, lay flat to dry. Do not bleach. Reshape while damp. Store the ornament flat between sheets of acid-free tissue paper when packing away your holiday decorations.
Frequently Asked Questions
What yarn weight is best for this crochet Christmas house ornament pattern?
A sport weight (category 2) 100% cotton yarn provides structure and fine stitch definition. Cotton prevents the openwork windows from sagging and holds a crisp edge after blocking.
How long does it take to make one ornament?
An intermediate crocheter can complete one house ornament in approximately 1 to 1.5 hours. This includes crocheting the body, roof, chimney, and border, as well as weaving in ends.
Do I need to block the finished crochet house?
Yes, blocking is strongly recommended to square the corners and fully open the mesh window panes. Pinning the damp cotton flat sets the architectural shape permanently.
Can I use acrylic yarn instead of cotton?
While you can use acrylic, it lacks the rigid stitch memory of cotton and may result in softer, less defined window openings. Cotton ensures the finished ornament hangs completely flat without curling.
Bring Handmade Warmth to Your Holiday Tree
Completing this Crochet Christmas House Ornament Pattern gives you a classic holiday keepsake that showcases precise stitchwork and timeless design. Focusing on accurate row counts, clean color changes, and blocking gives your finished ornament clean, distinct lines. Ensure your final hanging loop is centered at the roof peak before displaying your work.